Integrate CodeBuild with CodePipeline: Step-by-Step
Step-by-step setup for linking CodeBuild and CodePipeline: IAM roles, buildspec, artefacts, permissions and troubleshooting.
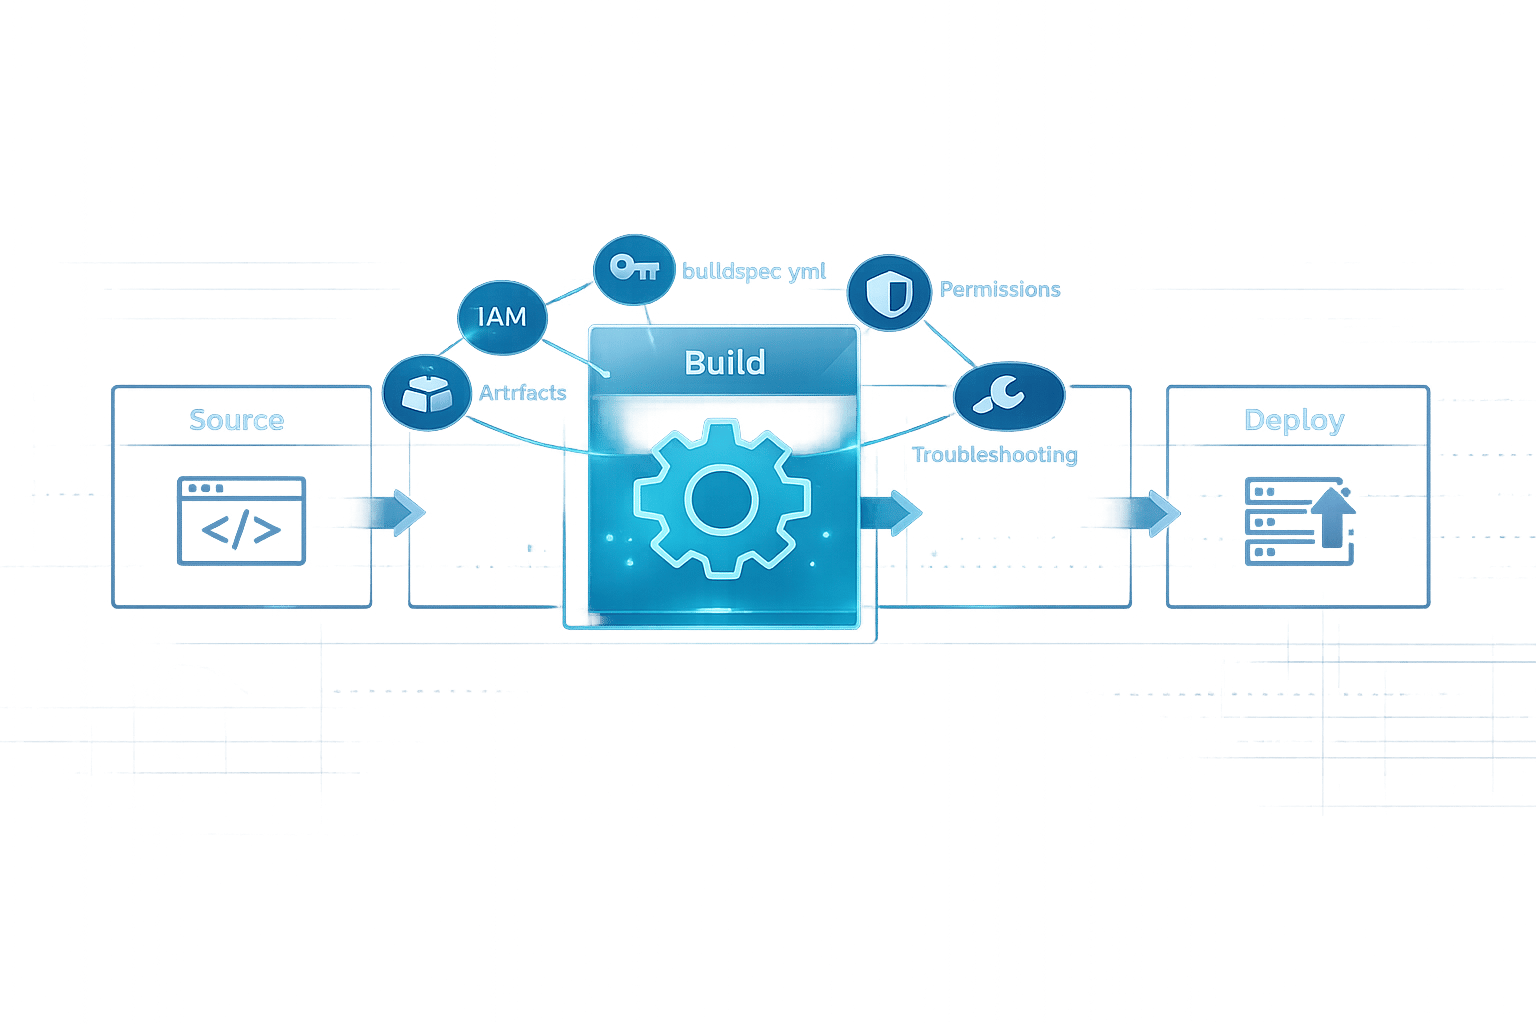
Manual deployments slow you down. Automating your CI/CD workflow with AWS CodeBuild and CodePipeline eliminates these delays. Here's how it works:
- CodePipeline orchestrates your workflow, moving code through stages like Source → Build → Deploy.
- CodeBuild handles building, testing, and packaging your code - fully managed and serverless.
- Together, they reduce release cycle times, minimise errors, and streamline deployments.
This guide explains how to set up CodeBuild and CodePipeline for automated deployments. You'll learn about permissions, configuration, and testing to create a reliable CI/CD pipeline. Perfect for small teams, especially with AWS Free Tier vs paid services eligibility.
Key Steps:
- Set up IAM roles with precise permissions.
- Configure your source code repository and
buildspec.yml. - Create and link a CodeBuild project to CodePipeline.
- Test and troubleshoot the pipeline for smooth operation.
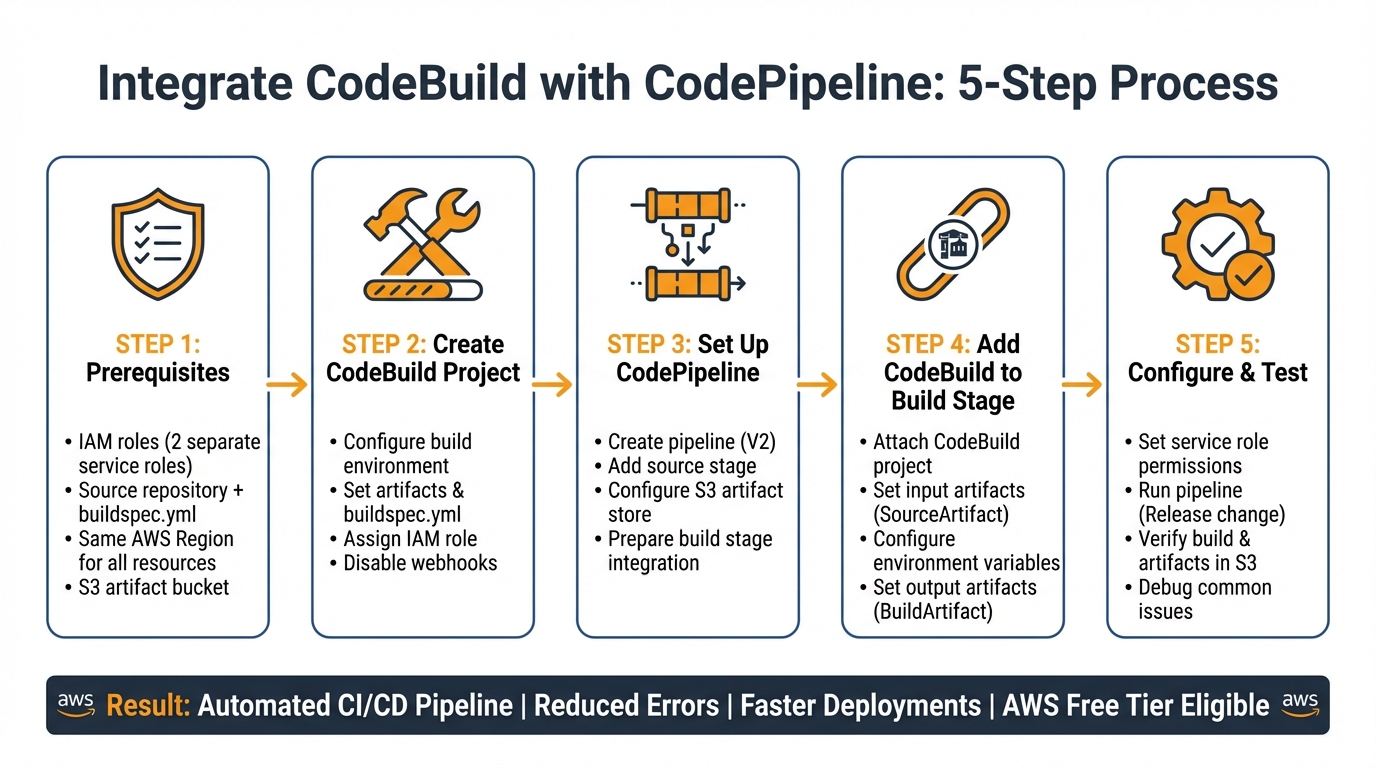
5-Step AWS CodeBuild and CodePipeline Integration Workflow
How to Integrate AWS CodePipeline with GitHub and CodeBuild: Complete Guide for CI/CD
Prerequisites for Integration
Before linking CodeBuild with CodePipeline, you need to set up a few key components. This groundwork helps prevent configuration problems down the line.
AWS Account and IAM Role Setup
Start with an active AWS account and correctly configured IAM roles. You'll need two separate service roles: one for CodePipeline to manage the workflow and another for CodeBuild to handle the builds. The CodePipeline service role must include permissions like codebuild:StartBuild and codebuild:BatchGetBuilds to initiate and monitor builds. The CodeBuild service role, on the other hand, needs a trust policy that allows codebuild.amazonaws.com to assume the role via sts:AssumeRole.
The CodeBuild role also requires permissions for CloudWatch Logs (to log build activities), S3 (to fetch source code and store build outputs), and access to your source repository. If you're storing sensitive data in Systems Manager Parameter Store or Secrets Manager, grant the relevant permissions, such as ssm:GetParameters or secretsmanager:GetSecretValue. Additionally, the IAM user or role setting up the pipeline must have iam:PassRole permissions. Without this, assigning service roles during the setup process won't be possible.
Source Code Repository Requirements
CodePipeline supports various source providers, including Amazon S3, AWS CodeCommit, GitHub, GitHub Enterprise Server, Bitbucket, GitLab, and GitLab Self Managed. For third-party repositories like GitHub or Bitbucket, AWS uses CodeConnections for authorisation. Ensure your CodePipeline service role includes the codestar-connections:UseConnection permission.
Your repository should include a buildspec.yml file in its root directory. This file outlines the build commands and phases that CodeBuild will execute. If you're using GitHub or Bitbucket with the "Full Clone" option (which allows CodeBuild access to Git metadata), add the codestar-connections:UseConnection permission to the CodeBuild service role. Tip: Disable CodeBuild webhooks within the pipeline to avoid duplicate builds and unnecessary costs.
AWS Regions and Compatibility
It's crucial that all resources are in the same AWS Region. Your source repository, CodeBuild project, and CodePipeline must be created in a region where both services are supported. Additionally, CodePipeline requires a dedicated S3 bucket (known as the artifact store) in the same region to store intermediate data between pipeline stages. This bucket is separate from any S3 source bucket you might use. While CodePipeline supports cross-region actions for certain scenarios, keeping everything in one region simplifies the setup process and reduces latency.
Once these prerequisites are in place, you're ready to move forward and create your CodeBuild project.
Step 1: Create an AWS CodeBuild Project
Once you've got your prerequisites ready, it's time to set up the CodeBuild project that will handle your builds. Head over to the CodeBuild console and click on "Create build project". Start by giving your project a unique and meaningful name.
Configure the Build Environment
The build environment determines how and where your builds are executed. You can choose from AWS-managed images, such as Amazon Linux 2 or Ubuntu Standard, or supply a custom Docker image from Amazon ECR or another registry. Next, pick a compute type: EC2 offers flexibility, while Lambda provides quicker start-up times.
If you're working with Docker image builds, make sure to enable privileged mode (note that this isn't supported for Windows). For environment variables, you can use Plaintext, Parameter Store, or Secrets Manager. Always avoid storing sensitive information, like AWS credentials or passwords, in plaintext. Instead, rely on Secrets Manager or Parameter Store to keep them secure and hidden from logs.
Set Artifacts and Buildspec File
The buildspec.yml file is where you define the commands that CodeBuild will run. By default, CodeBuild looks for this file in the root directory of your repository. Make sure your buildspec.yml includes build phases and an artifacts section (version 0.2 is recommended).
When setting up the artifacts for your project, you can either select "No artifacts" or configure an S3 bucket as the destination. Even though CodePipeline will override these settings during execution, this configuration is still necessary to ensure compatibility with the pipeline setup wizard.
Important: If you're planning to integrate this project with CodePipeline, make sure to disable the webhook option in the CodeBuild console. If left enabled, every commit will trigger two builds - one from the webhook and another from the pipeline - leading to unnecessary double billing and higher costs. Choosing cost-effective AWS services is essential for maintaining a lean pipeline..
Once these steps are complete, you can move on to assigning the required IAM role.
Assign IAM Roles
For CodeBuild to access AWS resources, it needs a service role. Assign a service role with the permissions it requires. Refer to the AWS Account and IAM Role Setup for a detailed list of permissions. Keep in mind that a single service role can be linked to up to 10 build projects.
Step 2: Set Up an AWS CodePipeline
Once your CodeBuild project is ready, the next step is to create a pipeline in the AWS CodePipeline console. Start by selecting "Create pipeline", followed by "Build custom pipeline".
Create the Pipeline
Begin by giving your pipeline a unique name. Opt for "V2" to access advanced features such as stage-level retries and pipeline-level variables.
For the service role, you can either choose "New service role" - allowing CodePipeline to automatically generate the required IAM permissions - or select an "Existing service role" if you've already set one up. CodePipeline requires an S3 bucket for storing pipeline artefacts. You can use the "Default location", where AWS creates a bucket named codepipeline-[region-ID]-[random-number], or specify a "Custom location" if you prefer to use an existing bucket in the same region.
Add Source Stage
The first stage of every pipeline must be the source stage. Here, you'll connect your source code repository. CodePipeline supports several source providers, including AWS CodeCommit, Amazon S3, GitHub (Version 2), Bitbucket, and GitLab.
If you're using GitHub (Version 2), you'll need to create a connection via the AWS Connector for GitHub. Then, select your repository and branch. For Amazon S3, ensure the bucket has versioning enabled, as CodePipeline requires this to trigger automatically on changes. Specify the bucket name and the S3 object key (the ZIP file containing your source code). For CodeCommit, simply choose the repository name and branch (e.g., main or master).
When setting the output artefact format, you can choose between "CodePipeline default" (which zips the source files) or "Full clone" (which performs a Git clone to include Git metadata). If your CodeBuild project needs to execute Git commands or access commit history, select "Full clone".
Below is a quick overview of the required configurations for each source provider:
| Source Provider | Required Configuration Fields | Change Detection Method |
|---|---|---|
| AWS CodeCommit | Repository name, Branch name, Output artefact format | CloudWatch Events |
| Amazon S3 | Bucket name (versioning enabled), S3 object key | CloudWatch Events / CloudTrail |
| GitHub (v2) | Connection, Repository, Branch, Output artefact format | Webhooks / Connection events |
| Bitbucket Cloud | Connection, Repository, Branch | Webhooks / Connection events |
Once you've configured the source stage, you're ready to link it to your CodeBuild project in the build stage.
Prepare for Build Stage Integration
With the source stage configured, set up the pipeline to pass the output artefact to CodeBuild. The source stage generates an "Output artefact" (commonly named SourceArtifact by default), which will be used as the "Input artefact" for your CodeBuild project in the build stage.
It's important to ensure that all resources, such as S3 buckets and repositories, are located in the same region, as specified in the prerequisites. With this setup complete, you’re ready to integrate your CodeBuild project into the pipeline's build stage.
Step 3: Add CodeBuild to the CodePipeline Build Stage
Attach the CodeBuild Project
Once you've set up the source stage, click on "Add build stage" in the pipeline wizard. From the options, choose AWS CodeBuild as your build provider. Then, select your existing CodeBuild project from the Project name dropdown. Make sure the project is located in the same AWS Region as your pipeline.
In the Input artefacts field, select SourceArtifact from the previous stage. This step ensures that CodeBuild receives the source code from your repository. If your buildspec file generates compiled code or packages needed for later stages, specify an Output artefacts name, such as BuildArtifact.
If multiple input artefacts are involved, use the PrimarySource parameter to identify which artefact contains the buildspec file. Ensure the input artefact name matches the output artefact name exactly from the prior stage.
Complete the build stage setup by configuring the appropriate settings to link CodeBuild with CodePipeline.
Configure Build Stage Settings
You can customise or add environment variables by specifying their Name, Value, and Type. Use Plaintext for non-sensitive data. For sensitive information, opt for Parameter (via Systems Manager Parameter Store) or Secrets Manager. Avoid storing sensitive credentials in plaintext to maintain security.
For build specifications, you can either use the buildspec.yml file from your repository or input the build commands directly in the console. If you need to handle multiple builds at the same time, enable Batch build and select Combine artefacts to consolidate all outputs into a single file for the next stage.
To avoid duplicate builds and potential extra charges, make sure to disable webhooks in your CodeBuild project settings when it's part of a pipeline.
Step 4: Configure Permissions and IAM Policies
Service Role Permissions
Once the initial IAM setup is complete, it's time to refine service role permissions to ensure secure communication between AWS services. This alignment with AWS performance best practices ensures your infrastructure remains efficient and cost-effective. Both CodePipeline and CodeBuild require their own service roles to access the necessary resources. If you're using the AWS Console to create a pipeline, AWS can automatically generate a service role for you. This role, typically named AWSCodePipelineServiceRole-[Region]-[Pipeline_Name], comes pre-configured with permissions for services like CodeBuild and S3.
For CodeBuild, its service role must allow codebuild.amazonaws.com to assume the role. It also needs permissions for CloudWatch Logs (such as logs:CreateLogGroup, logs:CreateLogStream, and logs:PutLogEvents), S3 artefact operations, and, if applicable, access to Amazon ECR for Docker images.
To follow the principle of least privilege, avoid using wildcards (*) when specifying ARNs for S3 buckets or CodeBuild projects. Instead, define exact ARNs. Additionally, include the aws:SourceAccount and aws:SourceArn condition keys in the CodeBuild trust policy. These measures help mitigate security risks, such as the "confused deputy" issue. Be aware that insufficient S3 permissions can cause the pipeline to fail, even if the build stage succeeds, as artefacts may not be stored correctly for subsequent stages.
Minimum Permissions for Users
Users responsible for creating or managing pipelines need the iam:PassRole permission, as highlighted in the prerequisites, to assign service roles to CodePipeline and CodeBuild resources. For most developers, the AWSCodeBuildDeveloperAccess managed policy is suitable. This policy provides all necessary functionality except for deleting projects or report groups. For users requiring full administrative control, the AWSCodeBuildAdminAccess policy is more appropriate, while auditors or monitoring users can use AWSCodeBuildReadOnlyAccess.
If users require access via the AWS Console, additional "describe" and "list" permissions for S3, CloudWatch, and IAM are necessary. However, these are not required for API-only access. For those using CodeCommit on Windows, ensure you clear outdated credentials from the Windows Credential Manager. This step prevents Git from using cached credentials that might lead to silent failures due to unauthorised access.
With these permissions in place, you can move forward to testing and verifying your pipeline configuration in the next step.
Step 5: Test and Verify the Pipeline
Run the Pipeline
Once the pipeline is set up, it will automatically start running. If you need to test it again later, you can manually trigger it by clicking the Release change button in the CodePipeline console. The console will show the progress of each stage - Source, Build, and Deploy - using statuses like Succeeded, In Progress, or Failed. CodePipeline relies on Amazon CloudWatch Events (or EventBridge) to monitor changes in your source repository (such as CodeCommit, S3, or GitHub). Every time you push new code, the pipeline is triggered automatically.
After running the pipeline, confirm that the build has completed successfully and that all artefacts are stored correctly.
Verify Build and Artefacts
To check the build status, click on the Details or CodeBuild link in the Build stage. This will take you to the CodeBuild console, where you can view the Build history. Use the View entire log link to open Amazon CloudWatch Logs and review the logs for each phase - install, pre_build, build, and post_build. Ensure all phases complete without errors.
Next, check the S3 bucket where the build artefacts are stored. The bucket name usually follows this format: codepipeline-[region]-[random-number]. Navigate to the folder named after your pipeline and its relevant subfolder for output artefacts. Download the latest ZIP file (sorted by 'Last Modified' date) and extract its contents. Verify that all the expected files and directories are present. For Docker-based builds, ensure the Amazon ECR repository contains the newly created image with the correct tag, such as the one specified by IMAGE_TAG or CODEBUILD_RESOLVED_SOURCE_VERSION.
If you encounter any issues, use the debugging tips provided below.
Debug Common Issues
Here’s a quick troubleshooting guide for common problems:
| Issue Category | Symptom | Tool |
|---|---|---|
| Permissions | "Access Denied" or failure to fetch parameters | IAM Policy Simulator / CodeBuild Service Role settings |
| Environment | Docker daemon fails to start | CodeBuild Project Environment "Privileged" flag |
| Source/Artefact | Downstream stage cannot find files | Amazon S3 Artefact Bucket (check ZIP contents) |
| Logic/Tests | Build succeeds but application fails | Amazon CloudWatch Logs (check test phase output) |
| Configuration | Pipeline fails on start | CodePipeline "Variables" configuration |
If the build fails at the beginning, check if the CodePipeline service role has iam:PassRole permissions. Also, confirm that the CodeBuild service role has the necessary access to the S3 artefact bucket. For Docker-based builds, ensure the "Privileged" flag is enabled in the environment configuration. Without this, builds requiring elevated privileges will fail.
To pinpoint issues, you can add echo commands in different phases of your buildspec.yml file. These commands will print variable values and execution steps in the logs, making it easier to trace where the problem lies.
Conclusion
Integrating AWS CodeBuild with AWS CodePipeline transforms how small and medium-sized businesses (SMBs) approach software delivery. By linking these services, you can create an automated pipeline where CodePipeline manages the workflow, and CodeBuild takes care of compiling, testing, and packaging - all without worrying about servers or infrastructure. This automation reduces manual errors, speeds up release cycles, and allows small teams to deploy quickly and efficiently.
Using the configuration outlined earlier, this integration simplifies operations while lowering deployment risks. With AWS CodeBuild's pay-as-you-go pricing, you only pay for the build minutes you use. Plus, many CI/CD setups qualify under the AWS Free Tier.
Once the setup is complete, you can expand its capabilities further. Automate unit tests, securely manage variables using Systems Manager Parameter Store, and enable real-time notifications through AWS SNS or tools like Slack. If you're managing multiple environments, consider setting up separate pipelines for development, staging, and production. This approach helps maintain structure and reduces potential risks.
As Full-Stack Developer Adekola Olawale explains:
Continuous Integration and Continuous Deployment (CI/CD) has become the backbone of modern software delivery.
FAQs
Why do I need separate IAM roles for CodePipeline and CodeBuild?
When using AWS, assigning separate IAM roles for CodePipeline and CodeBuild is a smart move to maintain security and enforce least privilege access. CodeBuild requires a role that focuses solely on permissions for build-related tasks, while CodePipeline needs a role to handle pipeline stages, such as triggering CodeBuild and managing deployments. By keeping these roles distinct, you minimise security risks, avoid privilege escalation, and gain better control over permissions tailored to the specific needs of each service.
What’s the minimum IAM permission set to get this pipeline working?
To configure the pipeline, you'll need permissions for the following actions: codepipeline:*, iam:ListRoles, iam:PassRole, and several S3-related actions such as s3:CreateBucket, s3:GetBucketPolicy, s3:GetObject, s3:ListAllMyBuckets, s3:ListBucket, and s3:PutBucketPolicy. Additionally, make sure the CodeBuild service role is granted only the permissions it requires to interact with AWS services, adhering to the principle of least privilege.
How do I stop duplicate builds (and extra costs) in CodeBuild + CodePipeline?
To cut down on duplicate builds and unnecessary expenses in AWS CodeBuild when using CodePipeline, you can manually stop unwanted builds.
- Using the AWS Console: Navigate to the Build history, select the build you want to stop, and click Stop build.
- Using the AWS CLI: Run the command
aws codebuild stop-build --id <build-id>to halt the build.
To prevent these builds from starting automatically, consider disabling webhooks (e.g., for GitHub) or tweaking your pipeline triggers to avoid triggering builds unnecessarily.